The Ugly Dress
")
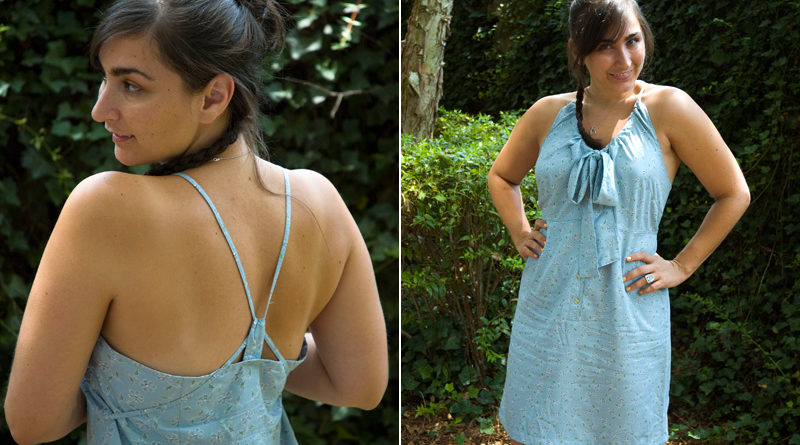
Wait! That’s not the ugly dress. Well, yes it is. It’s not ugly in that picture, but it was when I bought it at the thrift store. How ugly? This ugly:

You’ve probably seen this dress at the thrift store before, because there are millions of this dress, and they are all in thrift stores. So why, you’re probably asking yourself, would anyone buy such an atrocity, knowing no one else in the world wanted it? Because I thought the print was kind of cute. And I’ve been digging a lot of the refashion posts I’ve seen lately. And no, I can’t really sew, and my spatial common sense is lacking to say the least, but I have been successfully cutting the sleeves off my t-shirts for a while now and I thought, how much harder could this be?
So I improvised. I cut off the parts I didn’t like, I tried wrapping things around other things, and I came up with this:

It may not be perfect (I’m not much of a measurer), but I’m very happy with it. There wasn’t a ton of sewing and it didn’t require anything more complex than folding over an edge and sewing a seam. In fact, it was so un-difficult that I was able to put together a sort of tutorial. If you have a similar ugly dress, here’s what you can do with it.

My ugly dress had a tie at the waist. A lot of ugly button-down dresses do. So I crossed the ties up the back of the dress and over the shoulders and extended them a bit with wider straps that tie in the front.
If you were working with a dress that didn’t have waist ties and you didn’t want to add any, you could make just one long strap (instead of extending the waist ties with two straps, which is what I’m about to illustrate), throw it around the neck halter-style, and use the two ends for the bow. That would save you some trouble, actually. But you’d miss out on the criss-cross back. So.

This is just me over-explaining how to cut each face of the two extension-straps to the same size and shape. You can do it any way you like. It took me a while to figure out how to sew them, because I don’t know anything about sewing, but I do own clothes so I looked at my clothes until I figured it out.

Basically, what you’re doing here is making two casings, each going from the shoulder to the center of the neckline (where the bow will be), to run the extension-straps through. Notice that since you’re making two casings with open ends where the dress buttons, the dress will still be able to button just as it always has. That makes it very easy to get in and out. You just untie the bow and unbutton the dress.
(I should disclose that as I write this, I’m being terrorized by an invisible bug. It was visible for a moment, right on the wall in front of me, and it was big and had millions of long, spindly, horrible legs. I should’ve done something about it but I chickened out and walked away, even though I knew that if the bug disappeared before I came back, I’d be forever in suspense, waiting for it to crawl up my leg. And it did disappear. So if I seem at all distracted, that’s why.
Plus now I have to pretend nothing happened, because if I tell anyone, they’ll become terrorized too—and also annoyed with me because I don’t have a good answer for the inevitable question, “Why didn’t you just kill it?”
“I don’t like to” isn’t a good answer. “I’m allergic to bugs and I die when I touch them” is a good answer. “I tried to kill it but I got shot” is okay if you can come up with enough blood, but I think John in particular would not be less annoyed with me if he had to clean up blood, so mum’s the word.)
Anyway, this diagram kind of makes it look like there’s a big difference between the width of the skinny end of the extension-strap and the existing waist tie. There isn’t. They should be as closely matched as possible and neatly sewn, but if your ugly dress is anything like mine, the length of the waist ties will land the join inside the casing so that no one will ever see it anyway. If your waist ties are any longer than that, trim them so they land about at your clavicle when crossed behind your back.

You can do what you like with the little tab in the back. You just need a loop of fabric. I cut a wide strip, pressed both sides in to the center with the top one folded under, and sewed a seam up the middle to hold all the layers down. Then I folded that in half and sewed both edges to the inside of the dress, as shown. You could just hem the edges if you wanted, or you could skip hemming altogether if your fabric has nice raw edges and won’t unravel.

The easiest way to get your extension-straps through the casings is to attach a safety pin to the end and then push it through. Once you do, you have two options: you can be finished (the option I chose), or you can put the dress on, pin the shoulders to the straps where you’d like them to stay, and sew the straps stationary within the casing. This will ensure that the shoulders of the dress are always even. I elected not to do it because I like being able to adjust the height of the neckline by pulling the straps tighter before I tie the bow.

Enjoy your new, no-longer-ugly dress! It was easy, right? And I bet it looks great on you.
As for me, I’m still thinking about that bug.
How to Make an Ugly Dress Cute
Expl