Make fringe for your boots!

I wanted fringe.
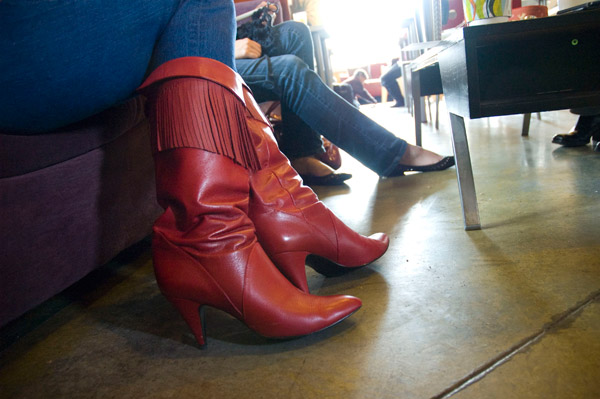
I didn’t want to buy new boots. I already liked my boots, with or without fringe. They were red and comfy and I got them at an estate sale for $15. A new pair of boots with fringe would run me a lot more than that, and I wasn’t willing to spend that money when I already had boots I liked.
But I couldn’t be happy without fringe.
After three days’ trial and error, I came up with a smashing pair of fringey-attachments for every pair of boots in my closet, which I can add and remove on a whim with no harm to the boots underneath. Once I figured out the right method, each pair took under an hour to make, and cost of a couple of scraps of leather, a little glue, and a pair of cord-stops from the fabric store.
Now everywhere I go, people tell me how much they love my fringey boots, and I can’t resist informing them that I fringed them up myself. I’m not sure why. I think deep down I must enjoy being resented.
Here’s how you do it.

You’ll need enough leather to wrap around each of your boots, in a color that looks good—either the same color as the boot, or a contrasting color you like. You can buy leather in a store, use scraps you have on hand, cut pieces from an old leather bag, or whatever you can think of. You just need to acquire some leather you like with your boots.
You’ll also need double cord stops, which are cheap, and you can grab them from the local sewing store or order online. It seems like you could just tie a nice tight knot instead of using cord stops, but please believe me when I say that does not work. At all. I tried. Hard.
Now, you have a choice regarding the final critical item(s): it’s either (a) some fabric/leather/superglue [not pictured], or (b) some ribbon and coordinating thread. You see, if you can cut thin, long strips—long enough to wrap around your calf, plus about 8–12″—from your leather, then you can just glue those on, suede-side-to-suede-side. However, if you want or need to, you can instead make your straps out of ribbon, in which case you’ll sew them to the leather with coordinating thread. Leather straps blend in better, but ribbon can be tied in a pretty bow. Your call.

Decide what shape you’d like your fringe to be. The top should be a straight line, but the bottom can be straight, curved, pointed—whatever you like. I chose a simple pointed design. Also, if you’re using leather strips instead of ribbon to attach your fringe, cut that out as well. (In the photo, it looks like my leather strips are only about as long as my leather shapes, but that’s an optical illusion! They’re 8″ longer.)
The length of each of your shapes should be about an inch less than the circumference of your calf where the fringe is going to sit. The cord stop will sit in that one-inch gap.

Attach your long leather strips (or ribbons) to the back of your leather shapes. If you do this neatly, you can have reversible fringe, which you can sometimes wear with the suede side showing! Yeah! Live it up! Two fringes in one!
As you can see, I didn’t glue mine that neatly, but that’s because my red boots fold over at the top. I knew that I was going to wear my fringe underneath that fold and no one was ever going see the top of the fringe, so I threw caution to the wind. Also, gluing is hard sometimes.


Slowly, painstakingly, cut your leather shapes into the finest, neatest fringe you can muster. Work patiently so that you don’t cut sloppy fringe, but don’t beat yourself up if some strips are a little wider than others, or if you’ve got a few errant curves and slants throughout. Nobody’s perfect, and once it’s all hanging down, it’ll look great.

If you’d like to add beads or feathers to your fringe, you can just hang them from the straps! You don’t need to fasten them on, because they’ll be trapped between the fringe and the cord stop, which means that changing your embellishments will be as simple as taking off your shoes. If you have focal items on your embellishments, be sure to hang them lower than the length of your fringe. Otherwise, the fringe will hang in front of them and they’ll be hidden. It’ll look like your fringe ate a big lunch.
Once you’ve embellished (or not embellished), feed each strap through the cord stop. Pay attention to which way the straps are facing so that they won’t get twisted, and align the cord stop so that the button that you squeeze is at the top.
Take a look at the length of the straps. If you like, you can trim them to the length of your fringe so they’ll blend in a bit, or keep them long enough to tie a decorative bow.

That’s it! Put your boots on first, then pull each fringe up and into place, and use the cord stop to secure it as tightly as you possibly can to ensure that they stay up all day. Note! It’ll be tempting to leave the fringe on your boots and just slip the whole assembly on at once, but don’t do it! The fringe will drop out of place without your leg in the boot, so if you put it on again without repositioning, it’s likely to slip down while you walk. How embarrassing.
I already had the leather and glue on hand, so this project cost me $1.99, the price of a pair of cord stops at my neighborhood Hancock Fabrics. So these are $17 boots you’re looking at, Internet.
See? I’m doing it again. I think I really do like being resented. That’s terrible.
Thanks to June for photographing my finished boots!