DIY Dollhouse Jewelry

Oh my god, you guys.

Do you find yourself making squealy squee noises when you see dollhouse stuff, like you might die from how cute and tiny it all is? I do. I can’t walk by without picking up all the tiny things and admiring their perfect tininess.
But I don’t have a dollhouse, so I don’t get to have the tiny things.
This week, it was finally time to take some tininess home for myself. I bought a tiny tea set and a tiny tool set from Hobby Lobby for $1.50 each and I made them into jewelry. I was very careful to make them elegant enough to pass for actual jewelry, but they’re better, because every time I look down, I get to squee myself half to death at what tiny things they are. So tiny. SO. CUTE.
If you’d like your own necklaces to harness the power of all the tiny littleness in the world, here’s how I made both of mine! It’s really easy, even if you haven’t made jewelry before, and you can use just about any tiny object your heart desires, even if it doesn’t have a hole. Look! DID YOU SEE HOW SMALL THE CREAMER IS?!

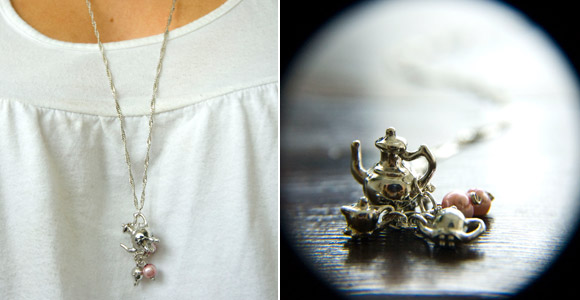
First, a tiny tea set is simple to make into a cluster necklace. You’ll need these items:
- A miniature tea set, or any set of tiny objects, ideally with handles or other loops.
- Jump rings.
- Two pairs of pliers (needle nose or chain nose pliers are easiest), for opening and closing your jump rings (here’s how).
- Additional charms or beads on head pins (optional).
- A long chain to hang your tea set on.
Use the above photo as your guide. Simple place a jump ring through the handle of each item, then chain the jump rings together. You can add pretty beads or other items for color and variety, and experiment with spacing: if you want more space between items, just add empty jump rings to the chain! As you can see, I added an empty ring below my teapot, because the teapot is large and would otherwise have obscured the other items.
Piece of cake, huh? OH WAIT THAT’S LIKE A TINY TEA JOKE. Ha.
The second style of necklace, with the charms on the big round charm holder, is really easy, too. I used a set of teeny tiny dollhouse tools, because I want everyone to know how handy I am. (I hung a shelf by myself last week, with nothing but power tools and the Internet to help me!) Here’s what you’ll need:

- Some tiny tools or other miniature items.
- Memory wire. This is a special kind of craft wire that is served in the form of a spring. It’s called “memory wire” because it holds its coiled shape. If you purposely stretch out a coil, it stays unrolled, but you can gently tug on it without it losing its form. I used Beadalon’s “Remembrance” wire, but you can grab whatever kind your local craft store sells. If you can’t find any at all, you can use a heavy-gauge wire and bend your own big coil, but that’s harder!
- Beads with holes just big enough to slide your memory wire through. Beads are important because they put some space between your items, and without them, your little tools will nestle together and become difficult to distinguish from one another. I used crystal bicones—two large pink ones between the tools and two small clear ones on the ends.
- A chain from which to hang your charm pendant.

All you have to do to make the charm holder is cut one and a half loops of memory wire. It’ll form a shape reminiscent of a keychain, and you can thread your charms and beads onto it and hang it on a chain. The memory wire will hold everything in place, so your job is done!
Now, if some of your dollhouse items don’t have holes to hang from (like my hammer), then before you can make them into charms, you’ll have to make a loop for each one. This can apply to either style of necklace, and it’ll work with any item that has a skinny part somewhere in the middle (as close to the top as possible). Gather these items:
- Pliable wire (I used 24 gauge).
- Wire cutters, ideally with a pointed flush-cutting end so you can trim your wire very close.
- Round-nose pliers.

Cut a piece of wire at least four or five inches long.
About 1″ from the end, make a small loop in the wire with your round-nose pliers.
Holding the loop with one hand, take the long end of the wire in your other hand and wrap it three or four times around the shorter end, just below the loop (see photo above). Take your time and try to make your coils sit right next to each other.

Decide where to attach your loop. It needs to be a narrow point in the item, so that the wire won’t slip off the top or bottom, and it needs to be situated close to the top. Let’s call this point the “neck” of your item.
With your left hand, hold the short end of the wire against the back of the neck with the loop pointing up. With the long end of the wire, continue wrapping in the same direction, but now, wrap around both the short end of the wire and the neck of the object. Do this several times until the loop is secure, ending on the back (where the loop is).

Trim both ends of the wire as close as possible to the item, making sure that no scratchy ends are sticking out. If they are, press them down with your pliers.

That’s it! Now you can hang your item from anything, including…

…your cute, cute little charm necklace. Put it on and squee the day away!
These necklaces make a sweet gift for any occasion, because with all the dollhouse stuff available in the world (especially online), you can find just about any object you can think of, and make something that will perfectly suit just about any interest or milestone or personality. Even Thai shrimp, for instance. And now that the holidays are coming up, keep an eye out for Christmas village accessories! You’ll be able to make some impossibly cute charms to wear to parties this year, like a little sled, maybe, or a tiny, tiny little wreath. Aww, a little wreath! For your necklace! THAT IS ADORABLE.
I’m beginning to see the problem with this project: now I want all of the dollhouse stuff that there is. And there is a lot. And I will surely die. From the bounty of cuteness.
Not such a bad way to go, I guess.