Falcons points! A shrink plastic text necklace tutorial
I’m not particularly keen on sports (needs more dancing) but I do like to wear the colors and drink the beer and look for the ball. I also sometimes like to boo.
This is my favorite cheer.

John is taking me with him to Sunday’s NFL playoff game. It would be a very big deal for our home team to win a post-season game this year. Everyone will be devastated and ornery if anything should go wrong, and I don’t want to be held responsible, so I need to cover my bases. Oh! That’s a sports phrase! Is there a football version of that? I need to cover my…flats? Is that a thing? Wikipedia says it’s a thing. I don’t know what it means.
NOT THE POINT. Anyway, I need to be good at my job tomorrow at the stadium. My job is to bring a cheer.
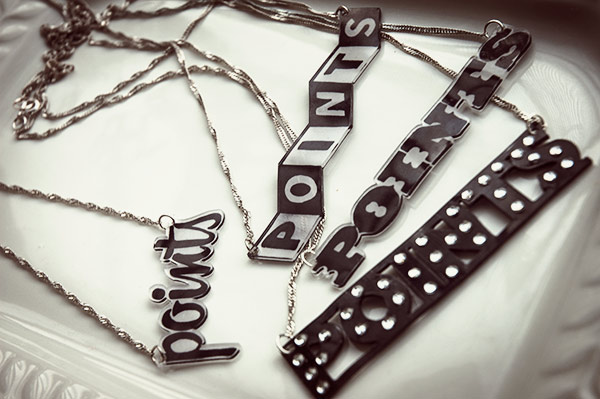
So I made some out of shrink plastic.

No, not that fancy name-brand stuff. The Michael’s we stopped at didn’t carry that. Of course, the lady I asked said they didn’t carry shrink plastic period except at Christmas, so there’s an outside possibility that “we only carry that at Christmas” is all the English she knows. Nevertheless, we tracked down the one box of “Shrink Art” in the store and I bought it. With a coupon. Apparently I could have just cut up a #6 takeout container, but this being my first experience, I wanted to start with something official.
I’ve never used shrink plastic before, so I learned a lot of things. Some things. I learned eight things.
- You can use colored pencil, but the color kind of rubs off after it’s baked. Permanent marker rubs off less.
- You can’t cut shrink plastic as you would cut paper because it’ll crack and ruin your work and you will be SO ANGRY. You have to handle it gingerly. (I originally said, “you have to be ginger,” but upon rereading it I think you might have found that discriminatory.)
- It only has to be in the oven for about a minute.
- While it’s hot, you can lay it on a curved surface and it’ll drape over it and harden in that shape.
- Once it’s baked, it’s pretty thick and sturdy.
- It shrinks a whole lot, to about half its original width and height (so 25% of the original size).
- Because it shrinks so much, it’s pretty forgiving of inconsistencies in your coloring and cutting.
- It’s pretty much the easiest thing ever and it’s super fun.
Edit: The necklaces were a huge success at the playoff game. I ended up giving them all away (except this one, below), and they made our team win the game!

How to Make Shrinky Dink Word Necklaces
Want to make a word necklace that you could be wearing in under half an hour? Here’s what I did.
Materials & Equipment:
- Shrink plastic
- Computer and printer (optional—you can freehand your text or trace it from elsewhere if you wish)
- Permanent marker
- Scissors and/or Xacto knife
- Hole punch
- Oven, preheated to 325 degrees Farenheit
- Kraft paper (e.g. a side panel cut from a brown paper bag)
- Embellishments and glue (optional)
- Chain, clasp and jump rings
- Pliers
Do it like this:
1. Choose your word and your typeface. If you are not a professional graphic designer, you might not have a lot of fonts on your computer. Since you’re just doing one word, though, you’re not limited to what came with the machine. Try one of the better design resource sites (I like Veer), where they let you preview your text in each typeface. Type your word, make the text big enough to fill the space, and right-click to save the image it generates. (Bonus: If you fall in love with a font, which is easy to do, they are usually under $30!)

For my four looks, I used Cowboy Western, Hipster Script, Checker, and Sense. Where I used Sense, I also added bars above and below the text, because this particular necklace is inspired by 30 Rock and Tracy Jordan’s EGOT.
2. Print it out big! I printed mine as wide as my shrink plastic (8″) and the finished pendants are each only about 4″ wide. So go big. You’ll also want to print the text backwards if you can, because shrink plastic (in my very limited experience) is only shiny on one side, and it’s the side you don’t draw on. There may be software on your computer that can flip it (Photoshop, Word, etc.), and if not, you may find a “mirror” option in your printer’s dialogue box after you hit Print. Many printers offer this because of the popularity of print-at-home iron-on t-shirt transfers. Hunt around until you find a way, and print your template.

3. Tape the edges of your shrink plastic, rough-side-up, on top of your printed template. You should be able to see the text through the plastic, so trace it carefully with permanent marker. Set the template aside and color in any parts of your shrink plastic that you want to be black.
4. Cut your word out. If your letters aren’t touching, be sure to leave a border around the text so the word will stay together as one piece. This part will end up being white.
5. Punch two holes in the top two corners of your word with a standard hole punch. The holes will of course be much smaller after shrinking.
6. Place your word, still rough-side-up, on the kraft paper and stick it in the oven. Watch it through the door. It’ll lie there for a short time, then it’ll quickly seize up, curl off the paper, shrink, and gradually lie down flat again. Once it’s flat, wait about 30 seconds and take it (paper and all) out of the oven. Lay it on the counter or stove until it cools and hardens (about another minute or two). Note: If your shrink plastic came with instructions, check to make sure they match what I’m telling you here. If it doesn’t, for pete’s sake, don’t listen to me. Do what it says on the box.
7. If you plan to embellish your word with rhinestones, glitter, feathers, gravel, money, teeth, etc. (look, I’m not one of these scrapbookers, I don’t know what people are gluing to what nowadays), this is the time. Glue it all down. Let it dry.
8. Connect your chain to the holes in your word with a jump ring on each side. Add a clasp in the back of the chain if necessary.
9. Wear it. Wear it and be awesome.
