The Gingerbird House Project

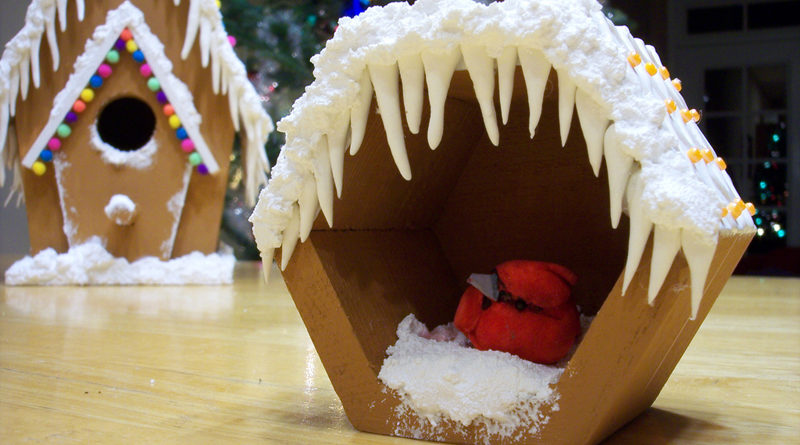
Presenting the Gingerbirdhouse and the Gingerbird Nook!
My friend Jenny and I designed these little non-edible gingerbread decorations for the Michael’s holiday craft contest. (Spoiler alert: We didn’t win.)
www.michaelscontest.com/uploads/2958
www.michaelscontest.com/uploads/2962
The house is about 10” tall, but the Nook, which is pictured in the foreground, is only about 2” high. It’s very small, and fits on the Christmas tree! Oh, and we bought everything at Michael’s, because we thought that might be important. It wasn’t, but it does mean you can go get everything all in one place if you want to make one of these.
- White acrylic craft paint
- Gingerbread-colored acrylic craft paint
- Foam paintbrushes
- Sno-Tex Medium
- White 3-dimentional fabric paint (make sure it’s 3-dimensional! We used Puffy)
- White Crayola Model Magic
- Hot glue and a glue gun
For the birdhouse:
- One wooden birdhouse (easy, right?)
- A bag of tiny miniature pompons
- A bag of regular-sized pompons
For the nook ornament:
- One tiny wooden box (we used a 3″ hexagonal box without a lid)
- Glass seed beads, any color
- One micro-tiny bird from the floral department
- Elmer’s or any all-purpose craft glue
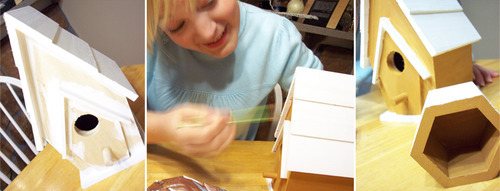
Use the craft paint to paint the birdhouse walls brown, and the roof(s) and base white. (On the Nook, you decide which part of your box is the roof, and paint that part white.) Two coats of each color should do it. Keeping the brown off of the white in the little crevice areas is, admittedly, a challenge. Or so I’m told, because Jenny did most of the painting. Somebody had to hang back and take a thousand pictures. I did paint the Nook, though, in exactly the same way, as you can see.
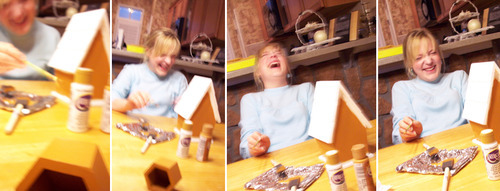
(Step 2) Hysteria
In an effort to be helpful while Jenny was doing a solo step of the project, I took as many pictures as I could while she painted. It’s all part of the documentation process! But I think having someone all around you with a camera can make you kind of crazy. So after Jenny had painted the white, she started painting the walls of the house, and she got a tiny, tiny little bit of brown paint on the white base.
“It looks like poop!” she cried. “Doesn’t it look like poop?” Normally, that probably wouldn’t be funny enough to push Jenny over the edge, but she was punchy from the pictures and she lost it.
I continued snapping photos as she tried to get a hold of herself and her paintbrush. “Stop taking pictures, or it’s going to look like I’m way too into this craft!” she said.
“You’re right. This must be how they get the kids on the craft kit boxes to look so happy,” I observed. “They get the photographer to say ‘poop’ to them.”
And that, for some reason, was the end of Jenny’s sanity and productivity for the next three minutes. Time for a giggle break (as pictured).
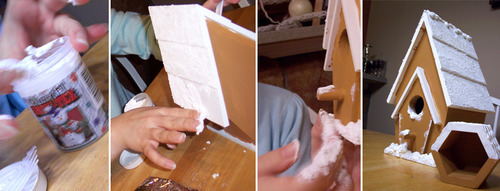
(Step 3) Snow
Sno-Tex is some kind of crazy paste that comes in a tub. It spreads with a consistency like gritty frosting (sort of) and dries to the consistency of gritty hardened compound (sort of). But in the context of a craft project, it totally looks like snow.
Spread the snow all across the roof of the birdhouse, and pile it up on the base. Jenny also added a little bit of snow on the perch and inside the bottom of the…you know…bird-hole.
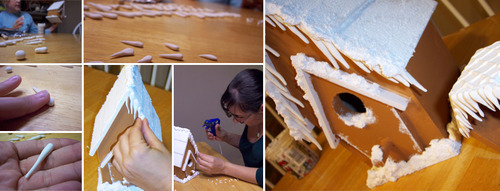
(Step 4) Icicles
The icicles are easy, because when you make a real gingerbread house, you just put icing into a piping bag and sort of make it glop down over the side a bunch of times. So it isn’t neat or uniform or precise, and you don’t want your fake gingerbread house to be any more neat or uniform or precise than a real one would be. That would be a dead giveaway.
We used a $4 package of white Model Magic from Crayola (a package, I might add, of which most is sitting in a Ziploc bag in my closet now, waiting to dry out from disuse and be thrown away unless I come up with something to do with it). It’s very easy to use, and it doesn’t make a mess.
Just pull off little pieces of the stuff and roll out tiny spikes. Flatten down the fat end of each one to make it a little easier to glue on. Then let them dry, and hot glue them to the eaves of the roof, across the front and down the sides. Make smaller icicles for the Nook, but glue them on the same way. Model Magic is squishy and foamy when it dries, which makes it look just like icing. It’s not delicious at all, but it lasts a lot longer.
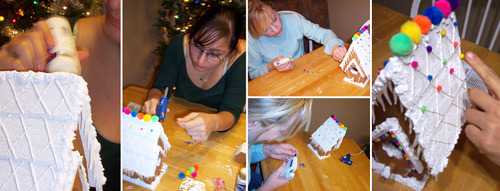
(Step 5) Criss crossess and pompons
Who says fabric paint is just for fabric?
Somebody actually might say that, but I’ve never heard it, so I chose dimensional fabric paint (a.k.a. Puffy paint) to draw crisscrosses on the roof of both the Birdhouse and the Nook. I know that I did this to mimic icing, because on most of the cute gingerbread houses I’ve seen, people pipe icing across the roof to make it look like this. What I don’t know is what those people are trying to make their icing loo like. I can see that the little hard candies around the door are a string of lights, and obviously the gummy circles that hang in the windows are supposed to be wreaths, but what on earth are white crisscrosses on the roof supposed to be?
Whatever.
Looks good.
With as steady a hand as you can manage, draw a crisscross design on the roof of both the Birdhouse and the Nook with the Puffy paint. Let it dry completely, which could take a few hours.
Now it’s time to add more snow, across the front of the roof (on both the Birdhouse and the Nook), to disguise the area where the icicles are attached. Jenny piled the roof-edge snow on in exactly the same way she did the snow on the base of the Birdhouse. She sometimes employed a plastic fork as her tool of choice, but mostly she did it with her fingers, which I think must have been incredibly soft and exfoliated after she was done. I hope that stuff’s non-toxic.
After the snow dries, hot glue fat pompons to the top of the roof where many gingerbread bakers would use gumdrops (again, no idea what it represents), and tiny pompons where little hard candies would go, in the places where the crisscrosses crisscross.
The Nook doesn’t get pompons. It’s very small, so it gets seed beads instead. Glue those on very carefully with any old craft glue for an elegant little gingerbird roof. (We tried pompons on the Nook at first, but it looked stupid. Don’t bother.)
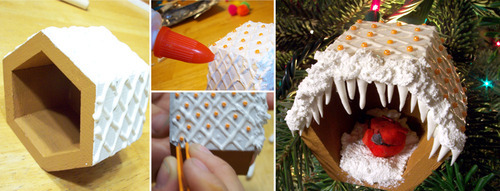
After everything was dry, we stuck a tiny bird in the Nook, sitting in a little nest of snow. I’m pretty sure an actual bird would hate that, but I think the illusion still holds up, because the little bird has a permanent scowl on his tiny styrofoam face anyway.
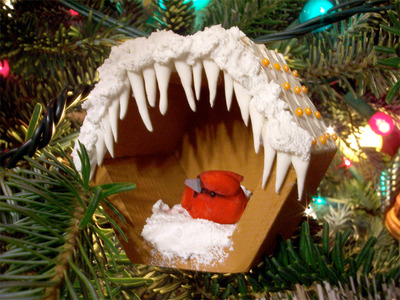
Final close-up of the Nook!
This is how our Nook turned out. It’s hard to get a sense of its true tininess. Take my word for it, though. It’s little.
You can screw a little cup hook into the top of the Nook so that it can be secured to a branch. Of course, as long as there are no cats or kids in the house, it’ll probably be okay just sitting there.
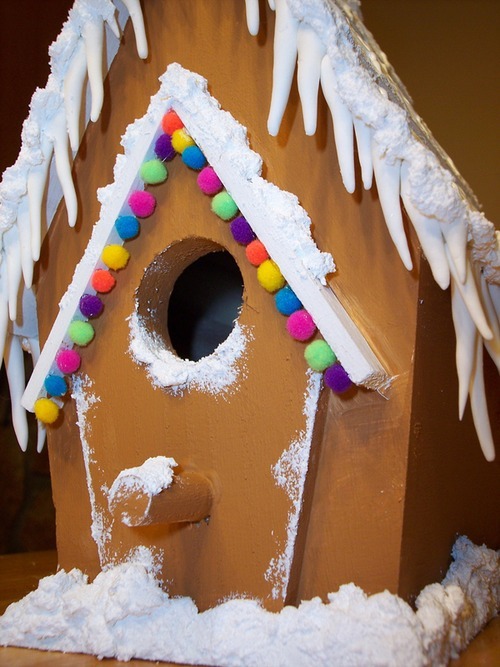
A detail close-up of the finished Gingerbirdhouse.
Up close, you can tell it isn’t really food, but it still looks cute!
Check out this page to see the projects we lost to in the Michael’s contest. I extend my congratulations to the winners.