Paging Dr. Tinycake: Mini No-Bake Honey Nut Cheesecakes

Last weekend, my mom and I went to an antique shop to look for patio furniture. We didn’t find any. I did come home with a $4 set of secondhand doll-size cutlery, though, because I know what’s really important in life. It isn’t home furnishings or financial responsibility. It’s tiny adorableness.
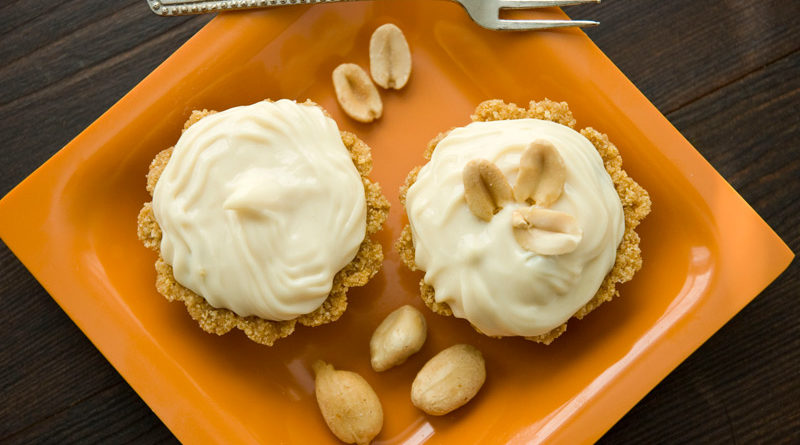
And that’s why, upon receipt of my new mini tart molds, I christened them by making no-bake mini honey-nut cheesecakes that are not only the ittiest, but the bittiest as well.
Right now, amid all these mentions of tininess and doll-size things, I bet you feel like you have a pretty good handle on how small these cheesecakes are. You think, “Yes, I can see that that is quite small, and I believe I comprehend its scale.” However, BAM!

WHAAAAAT! Yeah! Are you getting dizzy? It’s like Alice in Wonderland in here!
(I know that should probably say “up in here,” as per the expression, but I couldn’t bring myself to say it. It’s just not me, and in fact it’s so far from being me that it makes me feel very lame to say it. Like stopping at the gas station on the way to a silly costume party, or dancing in a nightclub ever.)
So yeah, that’s right. If you looked up “small” in the dictionary, there’d be a picture of these cheesecakes, only you wouldn’t be able to see them because they would be too small. BAM!
They’re also mighty. The honey in the flavored cream cheese brings a little extra sweetness, rounded out again by the salty peanuts. Could you make this with regular cream cheese if you wanted to? Yes. Just add a teaspoon of honey and a handful of chopped nuts to the filling yourself. And you can adjust that to taste, because this is a no-bake recipe. In fact, you can add extra honey and nuts to the recipe even if you use the flavored cream cheese! That is the beauty of making your own tiny cheesecakes, instead of picking them up in bulk at your local Stuart’s Tiny Cheesecake Emporium (not a real place).
You could also make them in a non-honey-nut variety. Of course, you’d be robbing your peanuts of a rare opportunity to feel gigantic.

As for the recipe, excluding the several hours I left my cheesecakes partly-complete and forgotten in the fridge, this dessert took about half an hour to throw together. The recipe below describes the ratio of crust to filling that I used to make the full three dozen tiny cheesecakes, but your mileage may vary. You might make thicker crusts or fill your cheesecakes less and end up with too much filling.
However! Pro Tip! If you should end up with leftover filling, and you want to make a bit more crust instead of eating it with a spoon in front of the sink (three cheers for you!), the formula for the crust is this:
3:10:1
butter:crumbs:sugar
So if you were to reduce this to 3 tsp butter, 10 tsp crumbs and 3 tsp sugar, you’d have one-twelfth the full crust recipe (enough, by my estimate, to make about three more tiny cheesecakes); if you used tablespoons instead of teaspoons, you’d have one-quarter the recipe below (roughly nine cheesecakes). You should be able to double or triple pretty easily from there.
Finally, credit where it’s due: the recipe for the filling is based on this one, and the crust is from Joy of Baking. Enjoy!
Tiny No-Bake Cheesecakes
Makes about 3 dozen
- 3/4 cup unsalted butter, melted
- 2 1/2 cups graham cracker crumbs
- 1/4 cup granulated white sugar
- 8 oz. regular cream cheese, softened
- 8 oz. honey nut cream cheese, softened
- 14 oz. sweetened condensed milk
- Juice of half a lemon
- 1 tsp vanilla extract
- Shelled salted peanuts to garnish
- In a medium bowl, combine butter, graham cracker crumbs, and sugar. Mix until completely moist and press firmly into the tart pans, making little crusts with no holes in them. Chill these in the fridge while you prepare the filling.
- Beat the cream cheese (both kinds), condensed milk, lemon juice and vanilla until smooth and thoroughly combined.
- Immediately before serving, fill each crust with filling, then garnish with peanuts. (Note: You can make both parts ahead of time and store in the fridge for up to two days before filling.)