CraftsDesserts and SweetsFoodFood Made Into CraftsRecipes

Butter-mint Buttons

Butter-mint Buttons

You know what I never liked? Butter mints. They were always right up there with those peanut butter chewy things in the orange papers. And circus peanuts. Oh, and candy corn. There must be a whole aisle in some frightful underworld grocery devoted to second-rate Halloween candy, ten cents a pound, guaranteed to disappoint even the most laid-back trick-or-treater. And this store, the rest of the year, ships billions and billions of butter mints worldwide, actually paying corporate customers to accept them.

Otherwise, how is it that every mom-and-pop operation on the planet can afford to have their four-color logo stamped on these things? Seriously! Besides, they taste like fossilized sugar with a hint of perfume, which is a dead giveway. They’re cheap with a capital eep.

Anyway, my friend Jenny likes them. A lot.

Hey, there are a lot of things about a lot of people that I don’t understand.

When Jenny moved into her first grown-up apartment last fall, I knew how much she had been looking forward to having a place she could decorate just so, without having to take anybody else’s tastes into consideration. That’s why figuring out a housewarming present was a little bit of a challenge. I knew her kitchen was fully stocked, and I didn’t want to risk giving her something decorative that she might feel obligated to have on display. Her master decorating plan involves white painted wood and lots of florals, which is very pretty indeed, but isn’t a design aesthetic I feel entirely qualified to contribute to.

So I made some butter mints in the colors of her decor. I figured they wouldn’t last long enough to become a visual burden, and surely I’d be able to tolerate the hideous insult of one of the world’s worst candies long enough to whip a up one little batch, right?

That is the long version of this story. The short version is that I made some homemade butter mints, tasted one while it was still fresh and hadn’t become rock-hard, chalky and oddly hollow, and instantly changed my mind about the entire confection. Viva la butter mint! I take back everything I ever said about them. They’re delightful. They’re candy’s best-kept secret.

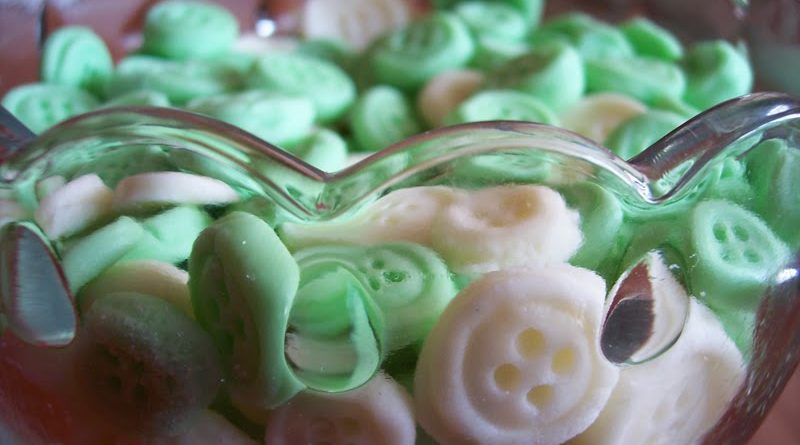
Not only are they secretly very, very tasty, but they can also be molded into virtually any shape. Even buttons! Which is adorable. Here’s an easy (but somewhat time-consuming) recipe for the ones I made. And in case you’re curious, they have been fully approved by the butter mint connoisseur in my life.

Frankly, it took me months to come up with buttons. I could not figure out what to mold them into. I wonder what other shapes would be good?

Ingredients:

  • 1/4 cup unsalted butter, softened
  • 1/2 tsp salt
  • 1/3 cup sweetened condensed milk
  • 3 1/2 cups confectioners’ sugar, sifted (I know…bummer)
  • Food coloring
  • Peppermint extract (or peppermint oil if you can find it)
  • Granulated sugar for dipping (optional)

Directions:

  1. Make a button mold! You’ll need buttons, of course. One button is enough if you want to make them all uniform. I used Amazing Mold Putty to do my yellow mold, which I know is food-safe because it has a picture of a baby on the box. I recommend it wholeheartedly, but if you have a preference for some other kind of pliable mold material, go for it! Just mix some up according to the package directions, then flatten it a bit press your button(s) into it, making sure the mold material is coming up into the holes. I used six different buttons, as shown. Set the mold aside to cure while you mix up your mints.
  2. In a medium-sized bowl, cream butter and salt together until well blended. Beat in the condensed milk, then the confectioners’ sugar. Remove from bowl and knead until mixture is well blended.
  3. Add flavor, to taste. I’d start with at least a teaspoon of peppermint extract (with peppermint oil, I hear you don’t need to use as much), then add until you’re satisfied. Err on the side of over-minting. With the scent of peppermint all over your kitchen and your hands, you’ll think the taste is stronger than it actually is.
  4. Add color. To get the colors shown, I divided my mint-paste into two balls and left one uncolored. To the other, I added four drops of green and one drop of yellow food coloring. Mix this part over the bowl so you don’t drip food coloring on the counter.
  5. Carefully remove the buttons from your cured mold.
  6. There are two options for molding your buttons: sugared or not sugared. (Compare in the photo above.) Since the mold is flexible, the sugaring isn’t a practical necessity, but you may prefer the way it looks. Either way, first you’ll shape a little piece of your mint-paste into a ball. It’ll take some practice to get the hang of exactly how much to use. Then [press one side of it into the granulated sugar, if you’re sugaring, and] push the mint firmly into the mold. Immediately unmold the button and set it down on a plate to set.One advantage to skipping the sugar step is that if you don’t like the way the mint comes out of the mold, you can ball it up and try again. It’ll get softer and softer as you work with it, so if it gets too soft, put it back in the bowl and get some more.The mints set up rather quickly, so you’ll notice as you’re breaking pieces off that the whole mess is getting stiffer. For the most part, you can still knead this back to life and work with it, but work as quickly as you can.
  7. When you get sick of making buttons, and/or you feel like you have as many as you need, you may still have mint-paste left. You can use the leftovers to make regular old butter mints, which will save you a lot of time. Just roll a piece of paste into a snake and cut it into pillows with a butter knife. Done.
  8. Once you’ve got everything molded/pillowed, let your mints sit uncovered for a few hours, until they’re good and firm. Then you can put them into a container, cover them up, and stick them in the fridge. If you leave them a long time, the ones in the bottom may smush together a bit, because fresh butter mints tend to stay nice and soft compared to their individually-wrapped cousins. So make sure your prettiest buttons are on top where they’ll be safe until you present them (or until your cupcakes are ready).

Kristina Ackerman

Kristina Ackerman is a busy freelance web designer, living and DIYing with her fella and their little fella in a cute old house in Atlanta, GA, USA.

Shares